20 / 12 / 19
「重学 OC」内存管理08 - 所谓Runtime
runtime是个啥
Objective-C 扩展了 C 语言,并加入了面向对象特性和 Smalltalk 式的消息传递机制。而这个扩展的核心是一个用 C 和 编译语言 写的 Runtime 库。它是 Objective-C 面向对象和动态机制的基石。 Objective-C 是一个动态语言,这意味着它不仅需要一个编译器,也需要一个运行时系统来动态得创建类和对象、进行消息传递和转发。理解 Objective-C 的 Runtime 机制可以帮我们更好的了解这个语言,适当的时候还能对语言进行扩展,从系统层面解决项目中的一些设计或技术问题。
runtime有啥用
利用关联对象(AssociatedObject)给分类添加属性。 遍历类的所有成员变量(修改textfield的占位文字颜色、字典转模型、自动归档解档)。 交换方法实现(交换系统的方法)。 利用消息转发机制解决方法找不到的异常问题。 等等......
前置知识点
那么重新认识Runtime之前需要一些前置知识,也就是我们之前的一些文章,这里按照顺序给出链接
弄懂以上内容以后我们看看runtime的应用。
runtime应用
runtime中常用的API
这里给出的方法大家可以放到自己的code snippet中随时使用随时查找。
// 动态创建一个类(参数:父类,类名,额外的内存空间)
Class objc_allocateClassPair(Class superclass, const char *name, size_t extraBytes)

// 注册一个类(要在类注册之前添加成员变量)
void objc_registerClassPair(Class cls)

// 销毁一个类
void objc_disposeClassPair(Class cls)

// 获取isa指向的Class
Class object_getClass(id obj)

// 设置isa指向的Class
Class object_setClass(id obj, Class cls)

// 判断一个OC对象是否为Class
BOOL object_isClass(id obj)

// 判断一个Class是否为元类
BOOL class_isMetaClass(Class cls)

// 获取父类
Class class_getSuperclass(Class cls)

// 获取一个实例变量信息
Ivar class_getInstanceVariable(Class cls, const char *name)

// 拷贝实例变量列表(最后需要调用free释放)
Ivar *class_copyIvarList(Class cls, unsigned int *outCount)

// 设置和获取成员变量的值
void object_setIvar(id obj, Ivar ivar, id value)
id object_getIvar(id obj, Ivar ivar)

// 动态添加成员变量(已经注册的类是不能动态添加成员变量的)
BOOL class_addIvar(Class cls, const char * name, size_t size, uint8_t alignment, const char * types)

// 获取成员变量的相关信息
const char *ivar_getName(Ivar v)
const char *ivar_getTypeEncoding(Ivar v)

// 获取一个属性
objc_property_t class_getProperty(Class cls, const char *name)

// 拷贝属性列表(最后需要调用free释放)
objc_property_t *class_copyPropertyList(Class cls, unsigned int *outCount)

// 动态添加属性
BOOL class_addProperty(Class cls, const char *name, const objc_property_attribute_t *attributes, unsigned int attributeCount)

// 动态替换属性
void class_replaceProperty(Class cls, const char *name, const objc_property_attribute_t *attributes, unsigned int attributeCount)

// 获取属性的一些信息
const char *property_getName(objc_property_t property)
const char *property_getAttributes(objc_property_t property)

// 获得一个实例方法、类方法
Method class_getInstanceMethod(Class cls, SEL name)
Method class_getClassMethod(Class cls, SEL name)

// 方法实现相关操作
IMP class_getMethodImplementation(Class cls, SEL name)
IMP method_setImplementation(Method m, IMP imp)
void method_exchangeImplementations(Method m1, Method m2)

// 拷贝方法列表(最后需要调用free释放)
Method *class_copyMethodList(Class cls, unsigned int *outCount)

// 动态添加方法
BOOL class_addMethod(Class cls, SEL name, IMP imp, const char *types)

// 动态替换方法
IMP class_replaceMethod(Class cls, SEL name, IMP imp, const char *types)

// 获取方法的相关信息(带有copy的需要调用free去释放)
SEL method_getName(Method m)
IMP method_getImplementation(Method m)
const char *method_getTypeEncoding(Method m)
unsigned int method_getNumberOfArguments(Method m)
char *method_copyReturnType(Method m)
char *method_copyArgumentType(Method m, unsigned int index)

// 选择器相关
const char *sel_getName(SEL sel)
SEL sel_registerName(const char *str)

// 用block作为方法实现
IMP imp_implementationWithBlock(id block)
id imp_getBlock(IMP anImp)
BOOL imp_removeBlock(IMP anImp)
Runtime简直就是做大型框架的利器。它的应用场景非常多,下面就介绍一些常见的应用场景。
- 关联对象(Objective-C Associated Objects)给分类增加属性
- 方法魔法(Method Swizzling)方法添加和替换和KVO实现
- 消息转发(热更新)解决Bug(JSPatch)
- 实现NSCoding的自动归档和自动解档
- 实现字典和模型的自动转换(MJExtension)
关联对象
这部分在之前介绍分类的文章里有详细的介绍,传送门
Method Swizzling
Method Swizzling 又俗称“黑魔法”,,简单说就是进行方法交换,可以通过以下几种方式实现:
- 利用 method_exchangeImplementations 交换两个方法的实现
- 利用 class_replaceMethod 替换方法的实现
- 利用 method_setImplementation 来直接设置某个方法的IMP
方法交换
需要注意的一点是,我们一般将动态添加方法、方法交换等等这些运行时操作放在load方法里面实现,我们在之前讲解分类的时候提到了:
当类被引用进项目的时候就会执行load函数(在main函数开始执行之前),与这个类是否被用到无关,每个类的load函数只会自动调用一次.也就是load函数是系统自动加载的,load方法会在runtime加载类、分类时调用。
方法交换一般用在将系统的某个方法交换成我们自己写的方法从而实现相应功能,这里也有两点需要注意:
-
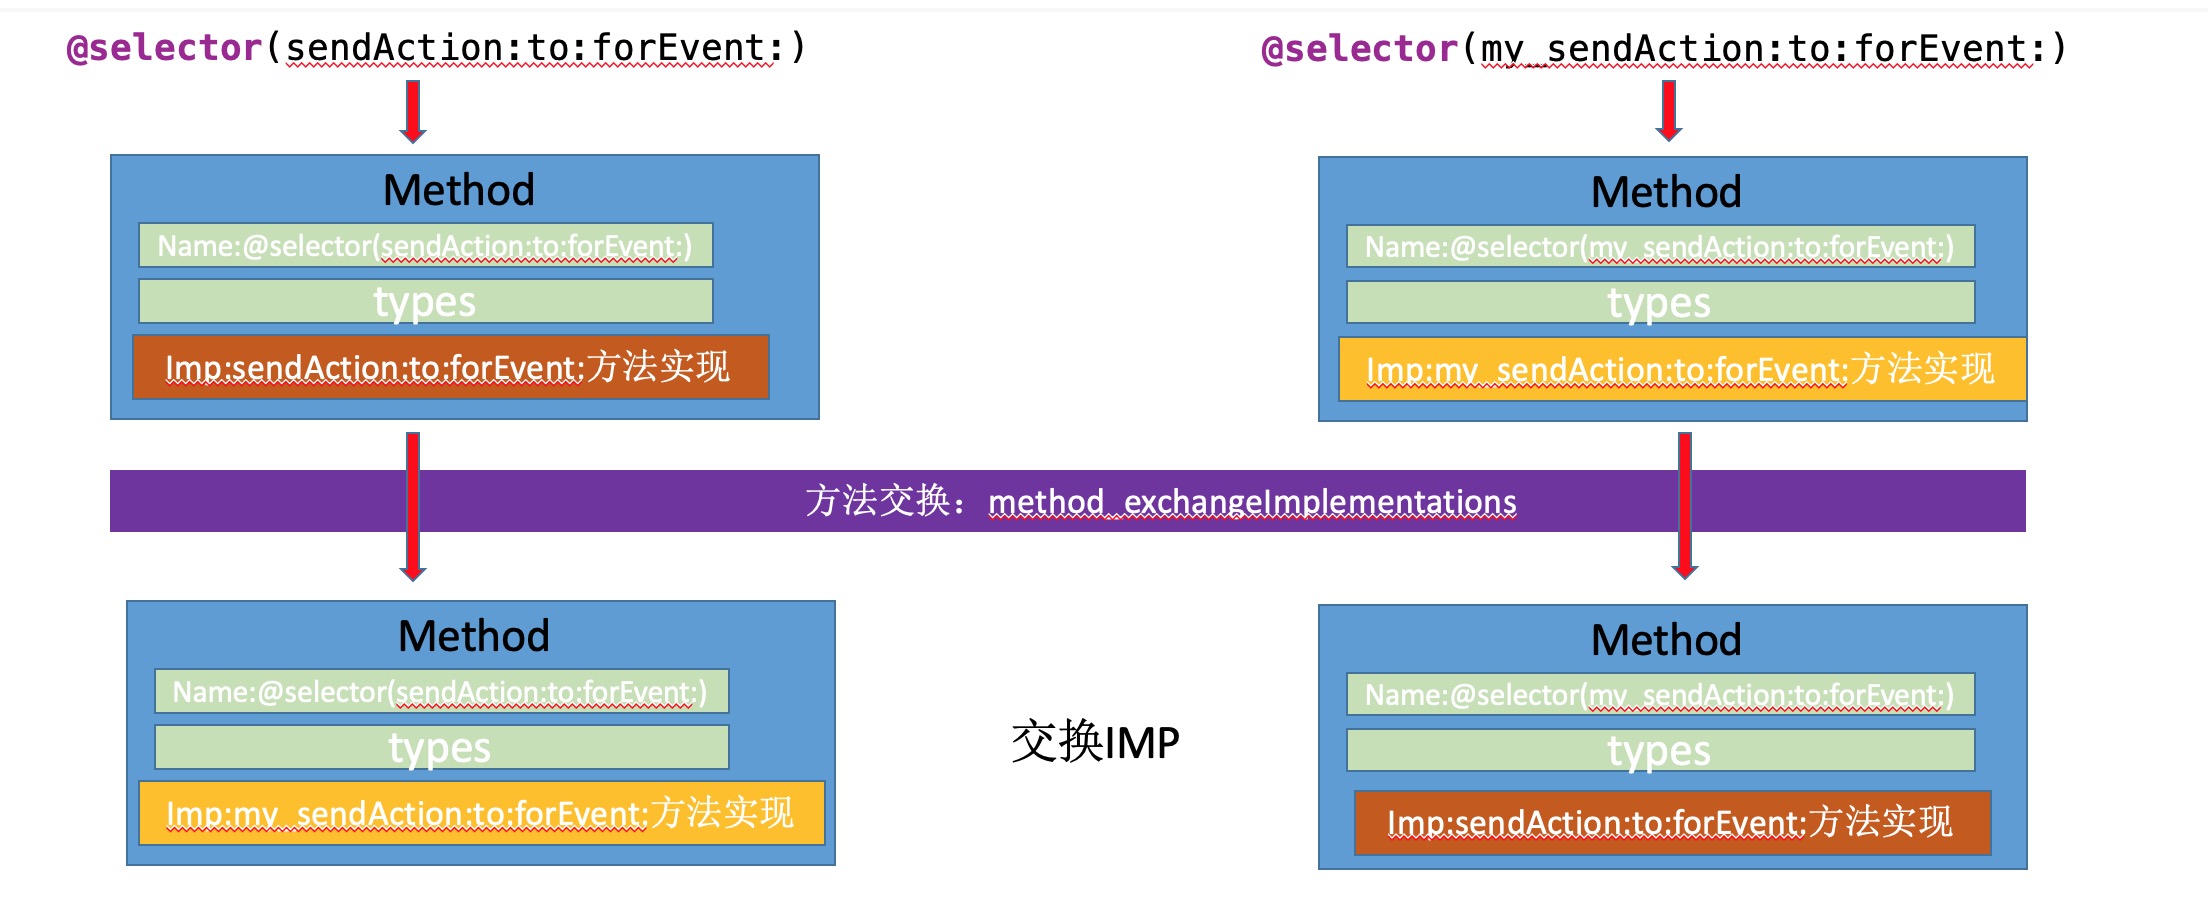
避免死循环: 方法交换交换的只是两个方法的实现,也就是imp的交换,所以原理如下:

用代码来演示,比如我们现在要拦截所有按钮的点击事件,在做出点击相应之前打印出相关信息,UIButton继承自UIControl,button的addTarget: action: forControlEvents:方法底层也是调用了UIControl的sendAction:to:forEvent:方法,所以我们需要将sendAction:to:forEvent:来进行方法交换,交换成我们自己的方法:
#import "UIControl+Extension.h" #import <objc/runtime.h> @implementation UIControl (Extension) + (void)load { //这里最好加上一个dispatch_once 虽然load方法原则上只会调用一次,但是万一开发者手动再调用一次的话,那么两个方法交换了两次就相当于没交换 static dispatch_once_t onceToken; dispatch_once(&onceToken, ^{ Method method1 = class_getInstanceMethod(self, @selector(sendAction:to:forEvent:)); Method method2 = class_getInstanceMethod(self, @selector(my_sendAction:to:forEvent:)); method_exchangeImplementations(method1, method2); }); } //我们自己实现的方法 - (void)my_sendAction:(SEL)action to:(id)target forEvent:(UIEvent *)event { NSLog(@"%@-%@-%@", self, target, NSStringFromSelector(action)); // 调用系统原来的实现 //调用sendAction:会出现死循环 因为sendAction:方法的实现是my_sendAction: //[self sendAction:action to:target forEvent:event]; //所以需要调用my_sendAction:方法来实现系统原来的实现 因为my_sendAction:方法实现就是系统的sendAction:方法实现 [self my_sendAction:action to:target forEvent:event]; } -
需要注意类簇,确保交换的是正确的类: 比如我们在使用NSMutableArray添加数据的时候,如果添加nil会出错,所以我们要将系统的这个方法交换成我们自己的方法从而可以进行判断,我们也知道
addObject:方法底层是调用的insertObject:atIndex:方法,所以:#import "NSArray+Extension.h" #import <objc/runtime.h> @implementation NSArray (Extension) + (void)load { static dispatch_once_t onceToken; dispatch_once(&onceToken, ^{ Method method1 = class_getInstanceMethod(self, @selector(insertObject:atIndex:)); Method method2 = class_getInstanceMethod(self, @selector(my_insertObject:atIndex:)); method_exchangeImplementations(method1, method2); }); } - (void)my_insertObject:(id)anObject atIndex:(NSUInteger)index { if (anObject == nil) return; [self my_insertObject:anObject atIndex:index]; }但是我们发现,这样做还是不行,根本进不去我们自己的my_insertObject:方法就会出错:
//reason: '*** -[__NSArrayM insertObject:atIndex:]: object cannot be nil'这是因为我们交换的类不对,在出错信息我们可以看到这个insertObject:atIndex:是存在__NSArrayM中的,所以我们应该交换__NSArrayM的方法而不是NSMutableArray的方法:
#import "NSMutableArray+Extension.h"
#import <objc/runtime.h>

@implementation NSMutableArray (Extension)
+ (void)load
{
    static dispatch_once_t onceToken;
    dispatch_once(&onceToken, ^{
        //这里要是交换方法的真实类
        Class cls = NSClassFromString(@"__NSArrayM");
        Method method1 = class_getInstanceMethod(cls, @selector(insertObject:atIndex:));
        Method method2 = class_getInstanceMethod(cls, @selector(mj_insertObject:atIndex:));
        method_exchangeImplementations(method1, method2);
    });
}

- (void)mj_insertObject:(id)anObject atIndex:(NSUInteger)index
{
    if (anObject == nil) return;

    [self mj_insertObject:anObject atIndex:index];
}
几种常见类的真实类型:

KVO
全称是Key-value observing,翻译成键值观察。提供了一种当其它对象属性被修改的时候能通知当前对象的机制。再MVC大行其道的Cocoa中,KVO机制很适合实现model和controller类之间的通讯。
-
KVO原理
KVO的实现依赖于 Objective-C 强大的 Runtime,当观察某对象 A 时,KVO 机制动态创建一个对象A当前类的子类,并为这个新的子类重写了被观察属性 keyPath 的 setter 方法。setter 方法随后负责通知观察对象属性的改变状况。 Apple 使用了 isa-swizzling 来实现 KVO 。当观察对象A时,KVO机制动态创建一个新的名为:NSKVONotifying_A的新类,该类继承自对象A的本类,且 KVO 为 NSKVONotifying_A 重写观察属性的 setter 方法,setter 方法会负责在调用原 setter 方法之前和之后,通知所有观察对象属性值的更改情况。
- NSKVONotifying_A 类剖析
    NSLog(@"self->isa:%@",self->isa);
    NSLog(@"self class:%@",[self class]);
在建立KVO监听前,打印结果为:
   self->isa:A
   self class:A
在建立KVO监听之后,打印结果为:
   self->isa:NSKVONotifying_A
   self class:A
在这个过程,被观察对象的 isa 指针从指向原来的 A 类,被KVO 机制修改为指向系统新创建的子类NSKVONotifying_A 类,来实现当前类属性值改变的监听;所以当我们从应用层面上看来,完全没有意识到有新的类出现,这是系统“隐瞒”了对 KVO 的底层实现过程,让我们误以为还是原来的类。但是此时如果我们创建一个新的名为“NSKVONotifying_A”的类,就会发现系统运行到注册 KVO 的那段代码时程序就崩溃,因为系统在注册监听的时候动态创建了名为 NSKVONotifying_A 的中间类,并指向这个中间类了。
-
子类setter方法剖析
KVO 的键值观察通知依赖于 NSObject 的两个方法:willChangeValueForKey:和 didChangeValueForKey: ,在存取数值的前后分别调用 2 个方法: 被观察属性发生改变之前,willChangeValueForKey:被调用,通知系统该 keyPath 的属性值即将变更; 当改变发生后, didChangeValueForKey: 被调用,通知系统该keyPath 的属性值已经变更;之后, observeValueForKey:ofObject:change:context:也会被调用。且重写观察属性的setter 方法这种继承方式的注入是在运行时而不是编译时实现的。 KVO 为子类的观察者属性重写调用存取方法的工作原理在代码中相当于:
- (void)setName:(NSString *)newName { [self willChangeValueForKey:@"name"]; //KVO 在调用存取方法之前总调用 [super setValue:newName forKey:@"name"]; //调用父类的存取方法 [self didChangeValueForKey:@"name"]; //KVO 在调用存取方法之后总调用 } -
举个例子 比较常用,比如我们在修改UITextField的占位文字颜色的话,可以通过获取UITextField的成员列表,发现其中占位文字的显示其实是个placeholderLabel,所以我们直接可以通过kvo修改这个label的颜色:(注意的是这个办法已经不能iOS13及以上的机型上使用了,这里只是做一个示例)

还有比如经常用的字典转模型框架MJExtension中,也是通过runtime函数遍历所有的属性或者成员变量,然后利用KVO去设值等等。
消息转发(热更新)解决Bug(JSPatch)
JSPatch 是一个 iOS 动态更新框架,只需在项目中引入极小的引擎,就可以使用 JavaScript 调用任何 Objective-C 原生接口,获得脚本语言的优势:为项目动态添加模块,或替换项目原生代码动态修复 bug。
关于消息转发,前置知识已经讲到过了,消息转发分为三级,我们可以在每级实现替换功能,实现消息转发,从而不会造成崩溃。JSPatch不仅能够实现消息转发,还可以实现方法添加、替换能一系列功能。
实现NSCoding的自动归档和自动解档
原理描述:用runtime提供的函数遍历Model自身所有属性,并对属性进行encode和decode操作。 核心方法:在Model的基类中重写方法:
- (id)initWithCoder:(NSCoder *)aDecoder {
    if (self = [super init]) {
        unsigned int outCount;
        Ivar * ivars = class_copyIvarList([self class], &outCount);
        for (int i = 0; i < outCount; i ++) {
            Ivar ivar = ivars[i];
            NSString * key = [NSString stringWithUTF8String:ivar_getName(ivar)];
            [self setValue:[aDecoder decodeObjectForKey:key] forKey:key];
        }
    }
    return self;
}

- (void)encodeWithCoder:(NSCoder *)aCoder {
    unsigned int outCount;
    Ivar * ivars = class_copyIvarList([self class], &outCount);
    for (int i = 0; i < outCount; i ++) {
        Ivar ivar = ivars[i];
        NSString * key = [NSString stringWithUTF8String:ivar_getName(ivar)];
        [aCoder encodeObject:[self valueForKey:key] forKey:key];
    }
}
现字典和模型的自动转换(MJExtension)
原理描述:用runtime提供的函数遍历Model自身所有属性,如果属性在json中有对应的值,则将其赋值。 核心方法:在NSObject的分类中添加方法。
- (instancetype)initWithDict:(NSDictionary *)dict {

    if (self = [self init]) {
        //(1)获取类的属性及属性对应的类型
        NSMutableArray * keys = [NSMutableArray array];
        NSMutableArray * attributes = [NSMutableArray array];
        /*
         * 例子
         * name = value3 attribute = T@"NSString",C,N,V_value3
         * name = value4 attribute = T^i,N,V_value4
         */
        unsigned int outCount;
        objc_property_t * properties = class_copyPropertyList([self class], &outCount);
        for (int i = 0; i < outCount; i ++) {
            objc_property_t property = properties[i];
            //通过property_getName函数获得属性的名字
            NSString * propertyName = [NSString stringWithCString:property_getName(property) encoding:NSUTF8StringEncoding];
            [keys addObject:propertyName];
            //通过property_getAttributes函数可以获得属性的名字和@encode编码
            NSString * propertyAttribute = [NSString stringWithCString:property_getAttributes(property) encoding:NSUTF8StringEncoding];
            [attributes addObject:propertyAttribute];
        }
        //立即释放properties指向的内存
        free(properties);

        //(2)根据类型给属性赋值
        for (NSString * key in keys) {
            if ([dict valueForKey:key] == nil) continue;
            [self setValue:[dict valueForKey:key] forKey:key];
        }
    }
    return self;

}
参考链接 * Runtime的相关知识 * iOS Runtime详解